


Maps
PRTG's "Maps" feature (which also sometimes referred to as "dashboards") is a unique concept that enables the user to create web pages with up-to-the-minute monitoring status information in a customizable layout.
Overview
There are countless possibilities for the implementation of maps. For example this feature can be used to:
- Create network maps with an overlay of status icons for each device on the map.
- Create quick views of your network that can be shown on network operations center screens.
- Create a quick network overview for publishing on the Intranet, allowing at-a-glance information for management of other employees.
- Create a custom view of the most important sensors in your monitoring setup.
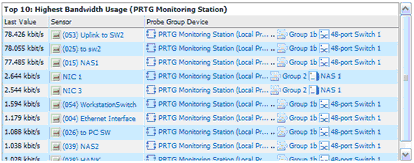
- Create Top 10 lists of the sensors of a specific group or device.
Technically a map is a normal web page and consists of the following:
- An optional background image (a PNG/GIF/JPG file, e.g. your company logo or a graphical view of your network).
- A set of map items, which can include sensor status icons, graphs or lists of sensors.
You can also specify the size of the map. Using the AJAX-based map editor, you can place the items anywhere on the map and you can also control the size of the items. Each map has a unique URL which can be used to link to the map. Users who want to access the map either need an account in your PRTG installation, or can access a "public URL" of the map if you enable the "Public Map" feature. Public maps contain a unique access key ("Map ID") in the URL that secure the map from unwanted visitors.
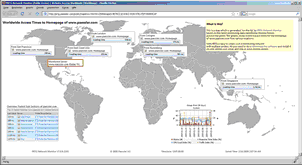
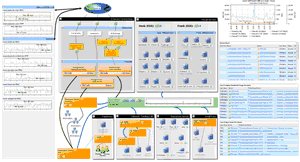
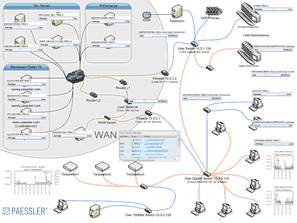
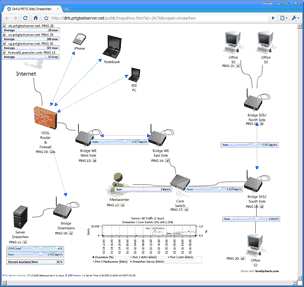
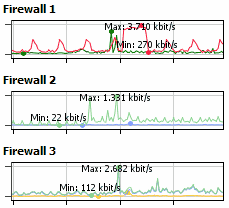
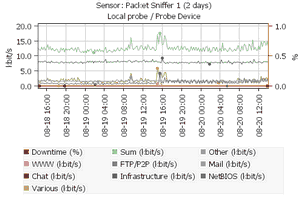
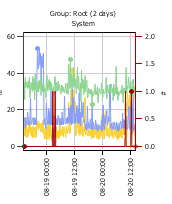
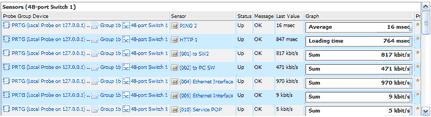
Sample maps
Here are a few sample maps which include live monitoring data:
Step 1: Create a New Map
To get started select "Maps | Add Map" from the main menu:
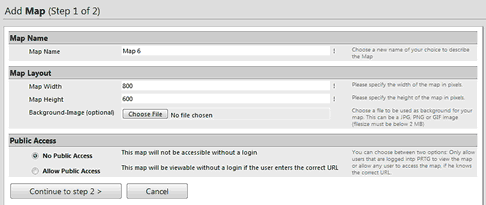
Fill out the fields and optionally select a map background image. Enable "Allow Public Access" if you want users without a PRTG user account to be able to view the map. Click "Continue to Step 2" and you will be taken to the new map.
Step 2: Add Items to the Map
Click on the "Map Editor" tab to enable the Map Editor:
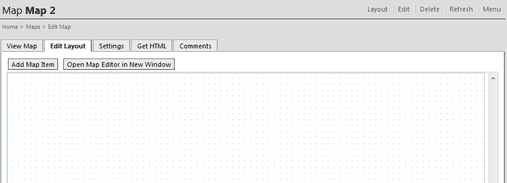
To add an item to the map click on the button "Add Map Item":
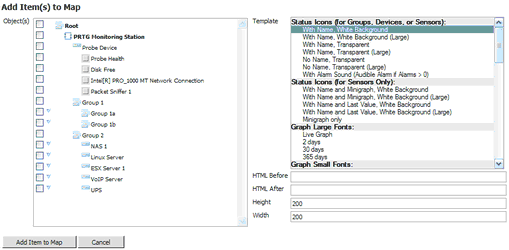
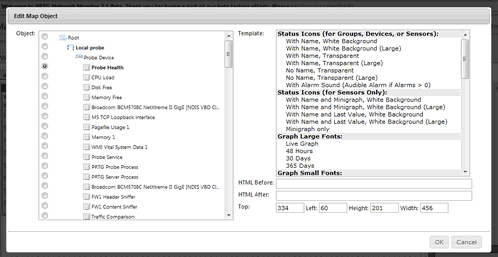
Choose one or more groups, devices or sensors from the device tree on the left and select a map item template from the template list on the right. You can optionally specify the size in pixels and add your own HTML code before and after the map element, too. PRTG will try to arrange the objects on the map automatically.
There are over 50 different map item templates available, the basic types are:
Status Icons and Minigraphs |
|
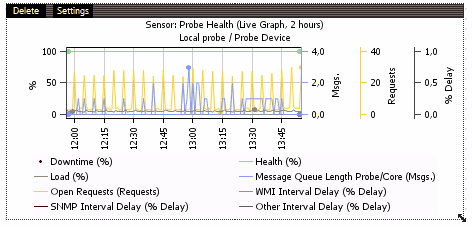
Graphs |
|
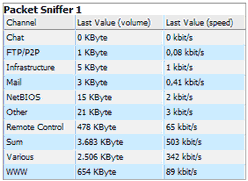
Tables |
|
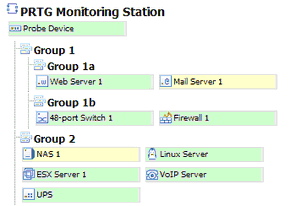
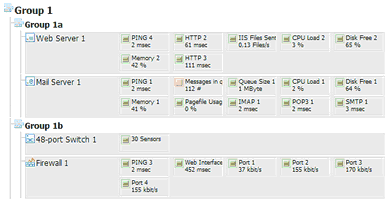
Tree Views |
|
Step 3: Move and Edit Map Items
As soon as you have added an item to the map you can modify it as follows:
- Move the item by clicking and dragging the black "grip bar" at the top. If you move an item outside the map area, the Map Editor will move it back in automatically. Remark: If you click on an object's name instead of the black "grip bar" (e.g. the name of an IP sensor), you will leave the Map Editor and enter the object's details page.
- Resize the item by dragging the small arrow at the bottom right corner.
- Delete the item by clicking the "Delete" link in the black "grip bar" at the top.
- Edit item settings by clicking the "Settings" link in the black "grip bar" at the top: A dialog will appear, similar to the one you already saw while adding a new map item. You can then change the associated monitoring item, template, the HTML as well as the position and size:
Please note that you cannot do the following in the Map Editor:
- You cannot draw any lines between items or put any additional pictures or graphics except for a background image.
- You cannot insert customized icons from outside PRTG.
However, if you want to create a scheme that shows the devices of your network and how they are connected to each other or if you want a world map, please use your own images and insert them as background image for your map. As second step, you can then spread the map items across your image as described above.
Step 4: Edit Map Settings
Click on the "Settings" tab to edit the general settings of a map. You can edit the following settings:
- Map Name: Enter the name of the map.
- Timezone: Select the timezone for a user who views the map via the public URL.
- Tag Filter: You can enter one or more "Tag Filters" (separated by spaces). If filters are entered here, only sensors carrying one of the tags (themselves or inherited) will appear in the table map views, and others will be hidden. This filter takes effect immediately after saving the settings and has only effect on table view elements (not on status icons, graphs, or tree views).
- Map Width/Height: Enter the size of the map in pixels.
- Background Picture: If you want to use your own background picture, click "On" and select a picture from your hard disk drive.
- User Group Access: Select which rights each user group has for this map (None, Read Only, Write, Full).
- Public Access: Here you can allow or disallow the public access to your map.
- Map ID: If public access is allowed, this string will be used to create the URL for this map. A proper ID is generated automatically and can be changed if necessary. As the ID works similar to a public password, it's a good idea to keep it hard to guess.
To enter any comments for your map (visible within PRTG only), please click on the tab "Comments", write down your notes and click "Save".
Step 5: View a Map and Share a Map
Click on the tab "View Map" to look at the final layout. To use the map outside of PRTG you have to two options:
- Option 1: Link directly to a web page with the map.
- Option 2: Show a map inside other webpages using an IFRAME.
Click on the tab "Get HTML" in order to discern the necessary URLs and HTML codes as well as additional instructions. Please note that further changes in your firewall settings may be necessary if you want the map to be accessible from the outside world.
Keywords: Maps,Custom Layouts,Public URL,Sharing Monitoring Data